Hacking IKEA Ansluta remote switch to work with Alexa
When I moved to London, I went through a shopping spree in IKEA to furnish my flat. One of the things I picked up was some Omlopp LED spots which are controlled remotedly by an Ansluta switch. This was great, it meant that I could have a light in my cabinet and over my TV, but it was less great as you can only pair one Ansluta remote with the Ansluta base unit. So to remedy this I decided to hack the Ansluta remote so I could control it over Wi-Fi, and later on hook it up to Alexa for voice control.
Now my total experience messing around with circuit boards and low level electronics like I had to do in this project, comes from completing the Arduino starter kit over an Easter a couple of years back, and what ever I remember from 7th grade physics, but how hard could it be right?
Taking the remote switch apart
Taking the Ansluta apart to figure out how it worked was a matter of prying out the housing inside the switch and then taking the circuit board out.
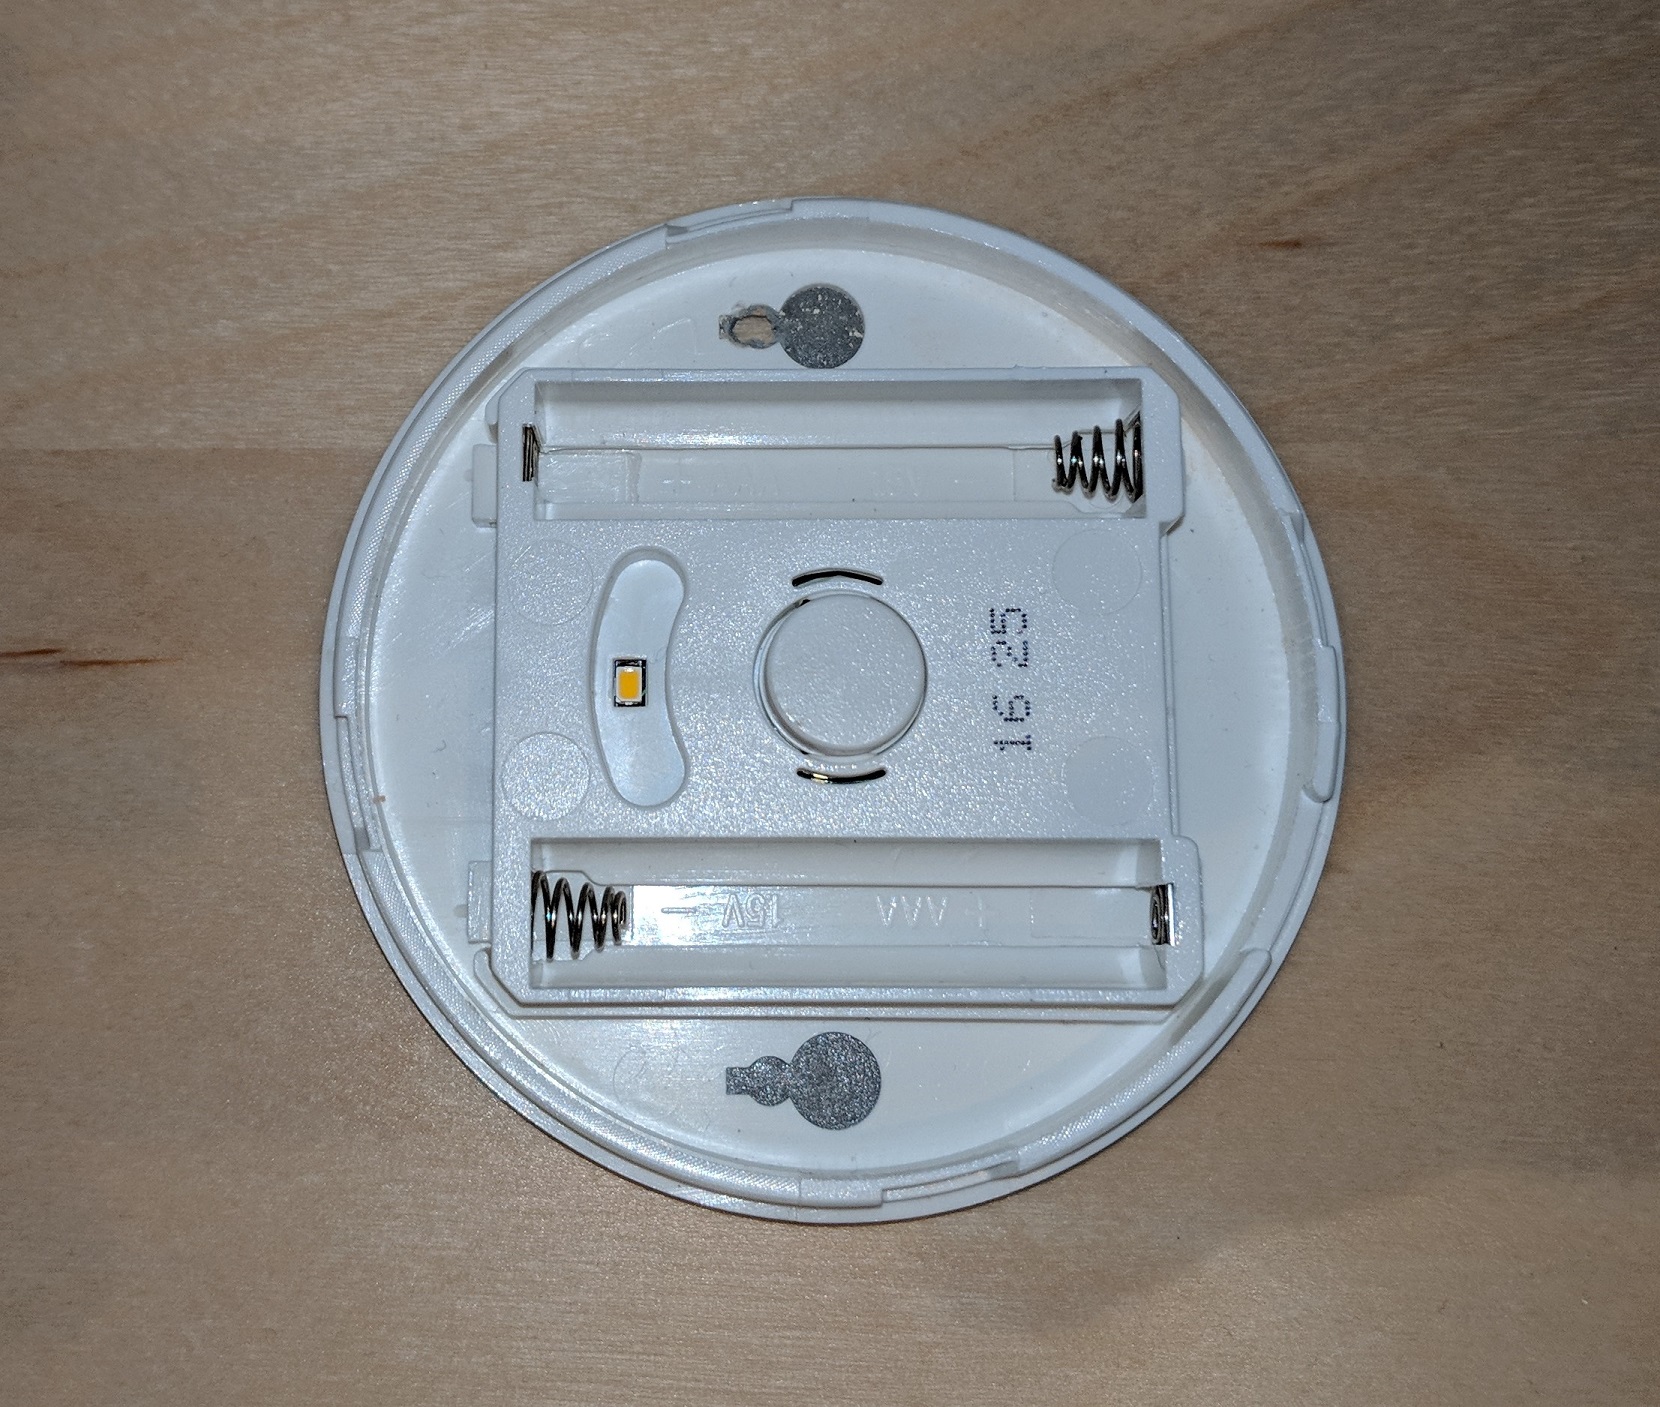
The Ansluta runs on two AAA batteries in series, which means that it requires 3 volts to operate. Luckily Arduinos and other DIY maker boards happens to supply 3.3 volts which should do for this project.

Looking at the circuit board you have positive and negative power terminals to the left, and then in the middle there is a button that tells the remote when to send a signal to the base for switching the lights on and off.
Luckily I remembered from my Arduino studies that you can use a resistor to function as switch that you control with your Arduino.
Now I said Arduino multiple times, but since I wanted to be able to control my lights via Wi-Fi, I was actually using a NodeMCU ESP8266 which is a cheap board with about the same capabilities as an Arduino, except it has Wi-Fi build in. This means that I did not have to figure out how shields work on Arduino which seems to have been a more expensive route to go.
No matter what board I was using, the plan was to solder two wires on to the switch so that connecting them would be the same as pressing the switch. After that I Would run a wire from the boards GND to the negative terminal at the bottom of the switch' board, and a wire from the boards 3.3v output to the positive terminal at the top.
That was the first step just to see if bypassing the button was indeed enough to control the switch. Once I got that confirmed, I would add a transistor to the two wires across the button, and attached to a pin on the ESP8266 board so I could control it.
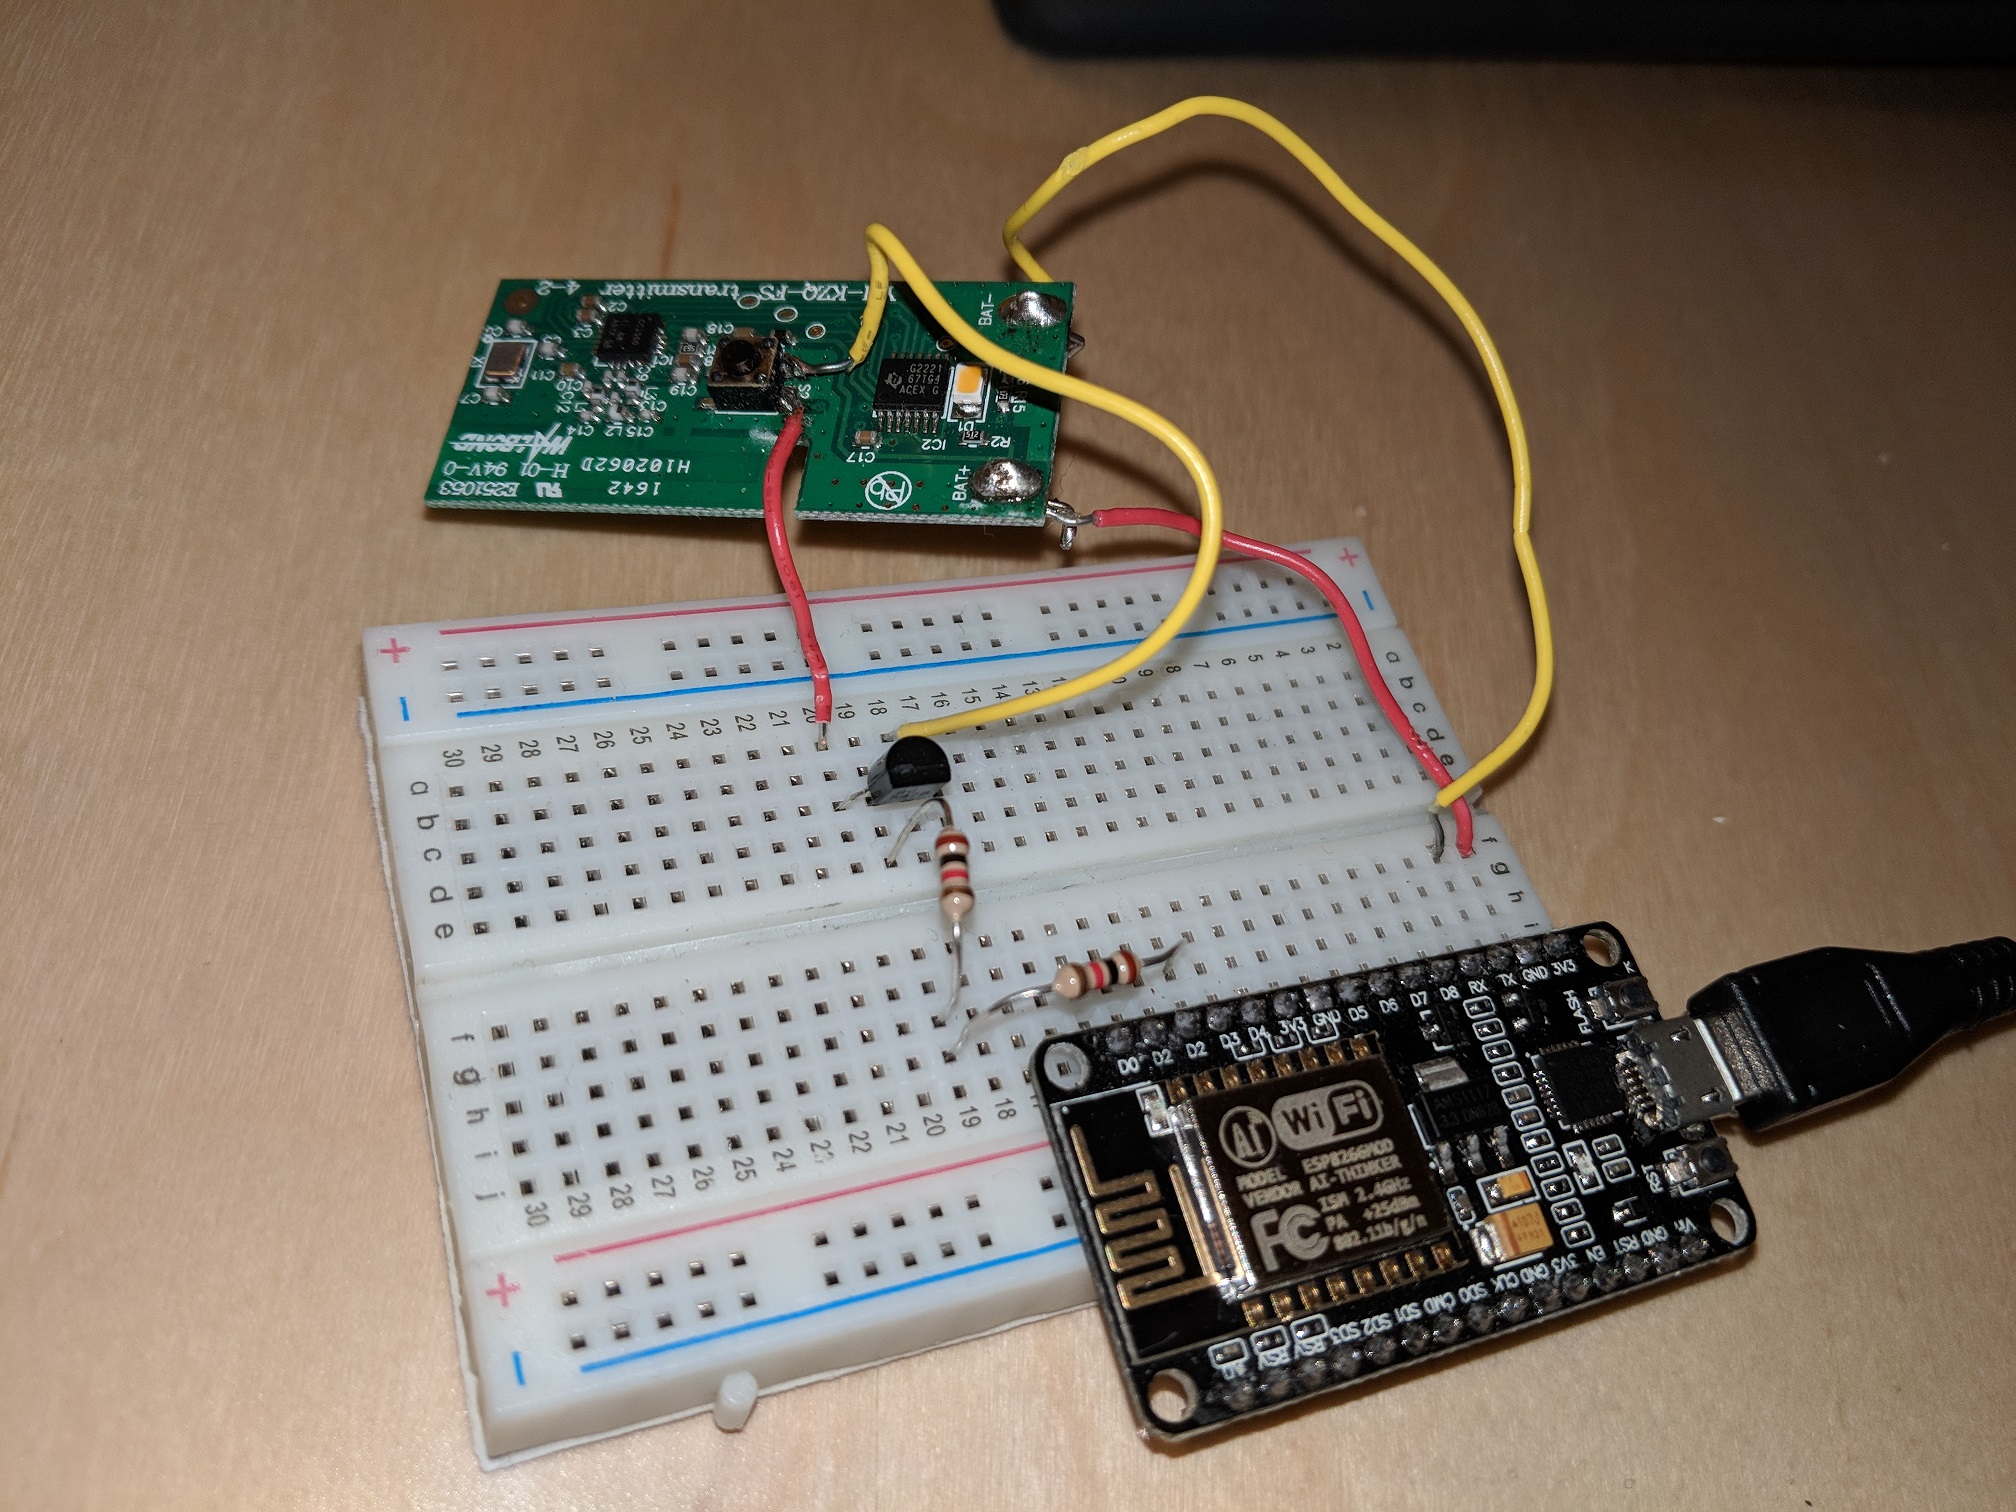
On the next picture, you can see how en Ansluta was connected to the ESP8266 via a breadboard. It looks a bit messy, but it will be cleaned up once everything works, and the main take a way here is that the ESP8266 needs to turn a pin on for a short time to trigger the transistor emulating a user pressing the switch on the Ansluta board, so that should be fairly simple.
It turns out I took this picture with the Ansluta board turned around compared to the previous picture, so not that the positive terminal is now at the bottom of the picture.
Using Mongoose OS and AWS IoT to press the switch
Initially I had the ESP8622 run its own webserver which would take GET requests and turn the lights on or off based on the payload. But it was both insecure, and a pain to get to work with Alexa, which it only did via IFTTT so it was not a natural integration.
When my setup suffered a hardware failure (apparently resistors between the ESP8266 board and the transistor is a good idea) and I had to redo it anyway, I wanted to try out AWS IoT on a project, and I found Mongoose OS.
Mongoose OS is an operating system that you can install on a board, and it will take care of all the low level maintenance such as network and connecting to wifi. It also have good support for AWS (and Google) IoT service. On top of Mongoose you will then write an App in either C or JavaScript. For this project I choose JavaScript, but I got another project brewing where I want to use C to find out how I can use third party Arduino libraries for some themometers that I am putting online.
I will not go into details of how to install Mongoose and setup your board and App, nor will I discuss how AWS IoT and the concept of Device Shadows works, as this blog post is alredy becoming a bit long. I am planning on writinga couple blogs about these, as I do believe the Mongoose community is missing a simple step by step guide to these topics.
This is the code that I ended up with for my Mongoose App, you can find an up to date version of this at GitHub. Before reading the code, there is an important aspect of the Omlopp spots that I have not mentioned. The lights have three states, ON, OFF and DIM, however when you press the buttons, you move between the states in order OFF -> DIM -> ON -> DIM -> OFF, this explains why the code allows to go to an DIM state. I will explain the code a bit further below.
load('api_gpio.js');
load('api_shadow.js');
load("api_sys.js");

// GPIO pin which has the transitor gate connected
//D3 pin is number 0 one nodeMCU for some reason.
//for reference see https://github.com/esp8266/Arduino/blob/master/variants/nodemcu/pins_arduino.h
let pin = 0;
GPIO.write(pin, 0);
GPIO.set_mode(pin, GPIO.MODE_OUTPUT);

// This is the sequence of light states when you press the physical Ansluta button
// The SKIP state is actually DIM on the lights, but to be able to save the state
// on the shadow as either OFF, ON or DIM we need to have only on DIM here to
// avoid ambiguities.
let states = ["OFF", "DIM", "ON", "skip"];
let stateIndex = 0;

Shadow.addHandler(function(event, obj) {
    print("addHandler received: ", JSON.stringify(event), JSON.stringify(obj));
    if (event === "CONNECTED") {
        Shadow.get();
    } else if (event === "GET_ACCEPTED") {
        setCurrentState(obj.state.reported);
    } else if (event === "UPDATE_DELTA") {
        handleDelta(obj.state);
    }
}, null);

function setCurrentState(lastReported) {
    let lastReportedState = lastReported.light;
    for(let i = 0; i < states.length; i++){
        if ( lastReportedState === states[i]){
            stateIndex = i;
            break;
        }
    }
    Shadow.update(0, {reported: {light: states[stateIndex]}});
}

function handleDelta(state) {
    let desiredState = state.light;
    if (isValidState(desiredState)) {
        updateState(desiredState);
    }
}

function updateState(newState) {
    while(states[stateIndex] !== newState){
        powerTransistorGate();
        stateIndex = (stateIndex + 1) % 4;
    }
    Shadow.update(0, {reported: {light: states[stateIndex]}});
}

function powerTransistorGate(){
    print("POWERING");
    GPIO.write(pin, 1);
    Sys.usleep(0.1 * 1000000);
    GPIO.write(pin, 0);
    Sys.usleep(0.1 * 1000000);
}

function isValidState(state) {
    for(let i = 0; i < states.length; i++){
        if ( state === states[i]){
            return true;
        }
    }
    return false;
}
Hopefully most of this code is self explainatory if you already have some coding experience. The main action happens in Shadow.addHandler, this registers a function as the handler for whenever the device shadow sends an event to the device. In this case I am only interested in three events.
CONNECTED is triggered when the connection to the device shadow is established. In that case we want to call the device shadow and get what our device state should be. So if our device reboots while the lights are on, it should still be in the ON state when it comes back up. To get this information you send a request to the Get MQTT queue, and the answer will come in the Get Accepted queue. This seems a bit convoluted, but thats the way it is, and dealing with distributed systems it does make some sense.
GET_ACCEPTED is then triggered, telling the device what state it should be in. After we have set the state we report back to the shadow what our actually state is so it can be updated with the correct information.
UPDATE_DELTA is the most interesting one, as this is the event for when we need to change our state and perform some action. Here we parse the payload to find the desired state, switches the button a number of times and then report back to the shadow that we are in a new state.
For switching the button, I have chosen 0.1 seconds of pressing and pausing between presses as that is fast enough for the lights to switch on in a reasonable time, even going from DIM to OFF which is three state changes, and also not so fast that the Ansluta circuit does not register all of the presses.
With this code, it is possible to control my Omlopp lights by sending messages with a special payload to some specific MQTT topic.
Integrating with an Alexa smart home skill
Since this whole project revolves around making lights come on, I thought it would be really neat if I could make a smart home skill for Alexa. A smart home skill enable me to say "Alexa turn on tv lights" instead a more convoluted skill activation like "Alexa tell house to turn on tv lights".
It turns out that creating a smart home skill is surprisingly easy. I have not created a normal Alexa skill yet, but as far as I know you have to write intents helping Alexa interpret what is being said in the context of your App. With a smart home skill you do not have to do that, as that is being done on the Alexa side of things. All you have to do is create a skill that is a smart home skill, and attach a Lambda function to it that follows a specific pattern.
There are a couple of pit falls that I will point out though. First of all, your Lambda functions has to run in specific regions to work with a smart home skill. Even though I am based in London, my Lambda function has to run in the Dublin region. While we are on the subject of setting up the Lambda function, be aware that there is both an Alexa Skills Kit trigger and an Alexa Smart Home trigger, I spend a long time trying to figure out why my skill did not trigger my Lambda which turned out to be because I used the wrong Alexa trigger.
When setting up your Alexa skill, you need to link it with an OAuth provider, and when you install the skill in your Alexa app you need to log in via that OAuth provider. This is so that for instance Philips can tell Alexa which HUE devices you own, and not which devices your neighbour owns. However in my case where I will be the only user of the Alexa skill and the skill will not be published, this information will be ignored by my Lambda.
This is not the most secure approach of course, and if I were to publish this Skill I would have to check the OAuth credentials, but considering that only Lambda is allowed to publish to the MQTT topic for my lights, only Alexa is allowed to trigger the Lambda, and the Alexa skill will only be installed on my account I should be safe enough.
The smart home skills work by doing a device discovery, which means that they will call the Lambda functions of your smart home skills with a discovery payload, and the Lambda must then return the information about which devices this user has available and what their capabilities are.
In my example I returned one device called "tv lights" (its a bit ambigous that the endpoingID is tv-spots, but thats because I forgot to change it when I changed the friendly name), and the capabilities is that they can be switched on and off (Alexa.PowerController) and can be dimmed (Alexa.BrightnessController).
Once your device is discovered, Alexa will call the Lambda when you ask her to switch the lights on or off, or when you ask her to dim it, and you then need to parse the request, publish to the MQTT topic and respond with a predefined payload. The biggest problem I ran into was that I was constructing the response payload slightly wrong. Any unexpected payload will cause an error in the Alexa skill, so even though you might have successfully changed the lights, Alexa will still say that "Something went wrong". This is quite fustrating as I had the payload from an old guide which was incorrect, and there were no logs telling me where my mistake was, so it took a bit of time debugging this specific issue.
For completeness I have posted my code below, but you can also find it at GitHub. For this to work you will need to setup access for the Lambda function to publish to the device shadows MQTT topic.
That is all for this, my first, blog post, but it also seems to have run a bit long. Reach out to me on twitter if you have any questions or comments on this piece, I would much appreciate it. Thank you for reading!
var AWS = require('aws-sdk');
var iotdata = new AWS.IotData({
    endpoint: 'a3uqqq8qiyasc3.iot.eu-west-2.amazonaws.com',
    region:"eu-west-2"
});

exports.handler = function (request, context) {
    console.log("DEBUG: " + JSON.stringify(request));
    var directive = request.directive;
    if (directive.header.namespace === 'Alexa.Discovery' && directive.header.name === 'Discover') {
        handleDiscovery(request, context, "");
    }
    else if (directive.header.namespace === 'Alexa.PowerController') {
        if (directive.header.name === 'TurnOn' || directive.header.name === 'TurnOff') {
            handlePowerControl(request, context);
        }
    } else if (request.directive.header.namespace === 'Alexa.BrightnessController') {
        // The spots only support 0, 50 and 100 percent,
        // so I will let anything outside that be the DIM settings
        if (directive.payload.brightnessDelta === -100 || directive.payload.brightness === 0) {
            turnSpotsOff(request, context);
        } else if (directive.payload.brightnessDelta === 100 || directive.payload.brightness === 100) {
            turnSpotsOn(request, context);
        } else {
            dimSpots(request, context);
        }
    }

    function handleDiscovery(request, context) {
        var payload = {
            "endpoints":
            [
                {
                    "endpointId": "tv-spots",
                    "manufacturerName": "Ikea spots",
                    "friendlyName": "tv lights",
                    "description": "Smart Device Switch",
                    "displayCategories": ["LIGHT"],
                    "capabilities":
                    [
                        {
                          "type": "AlexaInterface",
                          "interface": "Alexa",
                          "version": "3"
                        },
                        {
                            "interface": "Alexa.PowerController",
                            "version": "3",
                            "type": "AlexaInterface",
                            "properties": {
                            }
                        },
                        {
                            "interface": "Alexa.BrightnessController",
                            "version": "3",
                            "type": "AlexaInterface",
                            "properties": {
                            }
                        }
                    ]
                }
            ]
        };
        var header = request.directive.header;
        header.name = "Discover.Response";
        context.succeed({ event: { header: header, payload: payload } });
    }

    function log(message, message1, message2) {
        console.log(message + message1 + message2);
    }

    function handlePowerControl(request, context) {
        // get device ID passed in during discovery
        var requestMethod = request.directive.header.name;

        if (requestMethod === "TurnOn") {
            turnSpotsOn(request, context);
        }
        else if (requestMethod === "TurnOff") {
            turnSpotsOff(request, context);
        }
    }

    function turnSpotsOn(request, context){
        updateDeviceShadow("ON", respondPowerController, request, context, "ON");
    }

    function turnSpotsOff(request, context){
        updateDeviceShadow("OFF", respondPowerController, request, context);
    }

    function dimSpots(request, context){
        updateDeviceShadow("DIM", respondBrightnessController, request, context);
    }

    function updateDeviceShadow(newLightState, responder, request, context){
        console.log("DEBUG: updating device shadow to " + newLightState);
        var params = {
            payload: JSON.stringify({
                state: {
                    desired: {
                        light: newLightState
                    }
                }
            }),
            thingName: 'ansluta-switch'
        };

        iotdata.updateThingShadow(params, function(err, data) {
                if (err) {
                    console.log("ERROR: " + err);
                    context.fail(err);
                } else {
                    console.log("SUCCESS: " + data);
                    responder(request, context, newLightState)
                }
            });
    }

    function respondPowerController(request, context, powerResult){
        var contextResult = {
            "properties": [{
                "namespace": "Alexa.PowerController",
                "name": "powerState",
                "value": powerResult,
                "timeOfSample": new Date().toISOString(),
                "uncertaintyInMilliseconds": 50
            }]
        };

        respond(request, context, contextResult);
    }

    function respondBrightnessController(request, context){
        var contextResult = {
            "properties": [{
                "namespace": "Alexa.BrightnessController",
                "name": "brightness",
                "value": 50,
                "timeOfSample": new Date().toISOString(),
                "uncertaintyInMilliseconds": 50
            }]
        };

        respond(request, context, contextResult);
    }

    function respond(request, context, contextResult) {
        var responseHeader = request.directive.header;
        responseHeader.name = "Response";
        responseHeader.namespace = "Alexa";
        var response = {
            context: contextResult,
            event: {
                header: responseHeader
            },
            payload: {}

        };
        context.succeed(response);
    }
};